There always seem to be so many steps when you are learning how to paint. You have to watch and listen to so many different videos before you understand what you are doing. It just looks so complicated.
Well, here is an easy tutorial on how to paint including buying the supplies and creating the painting. I use one of my own paintings as an example to make it just that much easier for you! I know painting can seem a little daunting, especially when you are just getting started, but let me help you on your journey.
Get Your Painting Supplies
The first step to any hobby is to get the supplies. As long as you have the supplies, you can accomplish anything.
Painting is really personal! You might want to try abstract art or realistic art. We have lots of options open to us when painting. The next steps don’t matter as much as this one.
You can throw paint at the canvas if you want and it wouldn’t matter. You can paint however you want as long as you have the supplies.
The painting supplies you might need include:
Paint
When it comes to paints, you can start simple with cheap ones from your local craft store. With cheaper paint, you won’t feel as bad using more of it on the canvas. New painters don’t always realize how much paint they need, but it’s more than you would think.
When it comes to picking colours, you can really go with whatever you want. However, I would definitely suggest you get white, black, blue, red, and yellow. All the other colours can technically be made from these ones.
Paintbrushes
Paintbrushes can be found anywhere. You can get some at Walmart or even the dollar store. They might not be high-quality brushes, but they work fine to get you started. (Dollar store brushes do tend to have bristles falling out of them though so they aren’t my recommendation.)
If you are looking for more durable and professional brushes, I would recommend that you go to your local craft store. Most of them have brushes split by paint type. You might need specific brushes depending on what medium you use to paint.
Canvases
Again, canvases can be found pretty cheap at places like the dollar store. They aren’t the best ones you’ll ever find, but they work nonetheless.
I use Artist Loft canvases. They are cheaper than other brands (mostly) at my craft store. If you are looking for similar canvases, check out this link. Keep in mind that these canvases are not fancy professional ones. If you want to look at more canvases, check out Createlet and their amazing post on what canvases to use.
When buying canvases, you should also be aware that some of them work better with different painting mediums. It’s always a good idea to do a little bit of research on the canvases before purchasing.
Artist Palette
The palette is what artists use to mix their paint before putting it on the canvas, so you can probably see why it would be considered important. However, buying a palette really isn’t that hard. Mine is plastic and from the dollar store and I have been using it for years. As long as I can put paint on it and mix it, it doesn’t matter to me.
I have heard great things about glass palettes though, especially for oil paints. They appear to be easy to clean. But I have never tried one, so I can’t vouch for it.
Easel
The last thing you need is an easel. However, easels can get pretty pricey. You might opt-out of this stage and just paint on a flat surface, which works too. But easels do make painting easier and hurt your back a little less than painting on the floor.
I have an easel similar to this one. It isn’t anything special but it does the trick. My easel is a little tall for me (I’m only 5’2″). So if you are short like me, you might want to try a different one. Because this easel is skinny, it’s relatively easy to put away which is nice.
Easels help you to angle your painting so that it is easier to actually paint. I would suggest getting one, even if it’s just a small cheap one that goes on a tabletop.
Find a Concept or Picture You Want to Paint
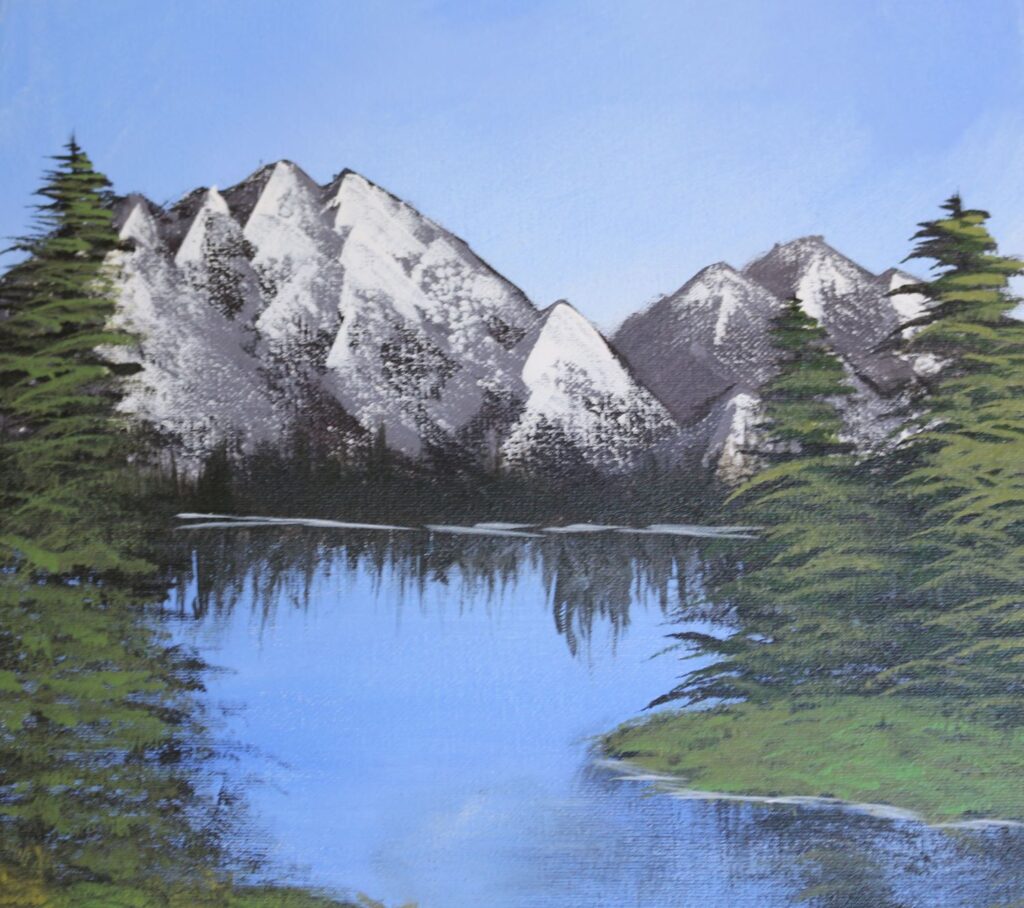
To start off your painting, you need to know what you want to paint. I usually paint mountain landscapes, not unlike Bob Ross’s paintings.
When you start a painting, you typically need an idea of what you want to happen on the canvas. You need to know how you want it to look and what colours to use. You can, of course, wing it too if you want, but it does make it harder, especially when you are first starting out.
I like to use reference photos for my paintings, which just means that I find a picture on the internet that I like and base my painting on it. That might mean I use similar colours or similar placement of the objects. It doesn’t mean I am aiming to copy the image exactly. I just use it as a guide for my painting.
If you want to learn more about reference pictures and other tricks for painting, click here to read more.
Apply The Base Layer to Your Painting
Now that you have an image in mind, let’s start the painting. Below is one of my paintings that I am going to use as an example.
You should add the sky in the background first. To mix those colours on the canvas, you may want to add some white paint to it first. It helps keep the canvas from absorbing all your colours and making it harder to blend.
Once you have a good wet coat of white, you can add your colours. If you plan on using multiple colours. Add one, then the other and then blend them in the middle. It should keep your colours from mixing too much.
Once you have the sky in place, you’ll also need to create the water if you plan on having any in your picture. Typically you will want the water to be a similar colour to the sky because of the reflections.
Basically, you need to cover most, if not all of the canvas, with your base layer of paint. It depends on what you are painting, however. If you don’t like to paint water, you don’t need to. You can add something else there, but it will likely need a different base layer colour too. Having many layers of paint makes the painting look more realistic and professional.
Now, you have a base layer.
Add the Background
The background is where you are going to add your clouds in the sky if you want any. Usually, you can make some beautiful clouds by making little strokes with a rounded brush. However, painting clouds can be a little tricky. I would suggest you watch some videos on how to paint clouds before you try them. My previous post about YouTube painters has some great people to teach you how to paint clouds. Don’t forget that if you add clouds, you also need to add their reflections in the water.
Once you have your clouds in place, you can add the mountains on top. You would typically want to place them just under the middle of the canvas. This gives the sky plenty of room in the picture.
The farther the mountain is in the background, the lighter it should be. It adds depth to the painting. A lot of the time when you are creating distance in a painting, the things in your background get lighter and a little less detailed.
You can see that I added snow to my mountains in the painting, but you don’t have to. You can add other details like rocky patches and grassy areas. The more details you add the more realistic it will be. However, adding too many might just make the painting look cluttered, so you have to aim for a nice balance.
I did not add a reflection for the mountains in this painting but you are welcome to add them at this stage. I try to make them a little lighter than the mountains themselves. And I add little white water lines over the water section to make it look more like a reflection.
Lastly, you will likely want a tree line as I have in the picture. I just ran my fan brush up and down in front of the mountains. By letting the strokes go over the water, you are creating their reflections too which you want.
For you, the background stage will be everything that it’s farther in your painting. Let’s say you want to paint a beach. The background stage would be the water, which makes the foreground the sand and the waves. Just paint what you think is the second farthest thing (when you count the sky) to the point of view of the painting.
Add the Foreground
The foreground is where you have all the things closer to the front of the painting. In this case, you have the trees in the foreground. To add these trees, I created a dark colour (like a dark brown or green) and painted the little islands the trees are sitting on. Next, you add the trees with a fan brush in that same dark colour. Just dab it really fast on the canvas to create the branches. As you get closer to the bottom of the tree, you make the branches larger.
These dark areas you just created are the shadows. All the green and bright colours on top of the dark layer are highlights. They represent the sun hitting the tree and making it brighter. You can add the highlight layer with the same brush (but clean obviously). By making the same motions on the trees as you used to create the previous branches, you can add the highlights.
You might want to create more than one layer of highlights. Just note that you should add more on one side of the tree to represent the angle the sun is coming from.
The little islands also need highlighting. You can use the same brush to just gently tap the colour onto those areas to create the illusion of grass and weeds.
Layers in a painting, like these highlights, really help to give it some depth, which in turn makes it look more realistic.
The foreground is all about detail. You need those shadows and highlights because that’s what you would see if you were standing in front of that landscape.
This stage of the painting is where you add everything closer to you in the painting. For you that might mean adding trees or a little cabin. As long as it includes the objects at the front, you should be adding them at this stage.
Accent the Painting with Details
As they say, it’s all in the details. And they aren’t wrong. Other than the highlighting, my painting doesn’t have too much detail to it, but there are some things I can point out.
I added a reflection of the trees at the very front of the painting. It’s just a bit of the dark colour zig-zagged lightly over the water. By not creating a clear image of the trees, it creates the illusion of moving water. The clearer the image, the more it’s going to look like the water is still.
I also added little water lines around the corners of the islands and in front of the trees in the background. It really helps to make the water look real.
You need the details in your painting to make it look realistic. Even if you like to paint with an impressionistic style or another style, details are still really important.
Lastly, don’t forget to sign the bottom corner. It can be a little tricky to sign your name with a paintbrush, so it might be better if you practice your signature a little bit first.
And now, you have a finished painting. Congratulations!
Practice Regularly
The last step to learning how to paint is just to practice regularly. You will get better with time. Practice is always recommended for any activity you want to get better in.
Keep in mind, that you can also get rusty if you don’t paint regularly. If you leave it for enough time, you might find that your skills have gotten worse.
All-in-all, you should be practicing to learn how to paint.
Painting isn’t easy, especially when you have no prior experience. It can be a little stressful when you have no idea where to start. That’s why I’m here! I know with this helpful guide, you’ll be painting masterpieces in no time!